|
Selections, Particles and Turbulence: A burning castle Please note: This is a beginners tutorial, so don't expect to find neat professional tricks, there's just the basics here.   After you have done this it is time to fire up Combustion - for this tutorial it does not matter if you use C*2 or C*3. After Combustion has loaded, create a new workspace by selecting File -> New. The (hopefully) well known dialog window shown below appears. Select the options as seen in the picture:  Type: Composite Name: Burning Castle Format Options: PAL DV (you may choose NTSC as well if this is your video format) Duration: 120 Frames (NTSC) respectively 100 Frames (PAL) for 4 seconds of video Bit Depth: 8 bit Mode: 2D After clicking OK you should see your new composite in the viewport and the workspace. Now we have to import the bitmap of the castle we want to work with. Do that by right-clicking your composite in the workspace panel and selecting Import Footage. In the following dialog locate the bitmap on your filesystem, mark it for import by clicking on it and then click OK. The picture should now be visible in your viewport. Before we start playing with fire let's first darken the sky and get some 'smoky' effect onto it so the atmosphere of the picture will be darker and more fitting to the mood of destruction it soon will get. :-) We will do this using the Turbulence operator which is one of the many effects coming with combustion. Before applying the operator we want to make shure that it only affects the parts of the picture we want it to affect (eg the sky). To achieve this we are going to draw a selection: Extent the listview in the workspace by clicking on the triangles left of the entries as seen on the picture below. All operator we are going to use in our project will be directly applied to the 'tut1_castle' layer, not the composite itself.  Right-Click the tut1_castle layer and choose Operators -> Selections -> Draw Selection from the list. The selected operator appears in your workspace (as first operator in your castle-layer) and the viewport ist automatically switched to the output of the Draw Selection operator. If you move your mouse above the viewport you see that the pointer changes to a blue crosshair which means you are ready to go - draw a selection (set a point by left clicking your mouse, backspace to delete the last point) containing the sky, the castle and parts of the treetops as seen in the picture below. To finish the selection position your mouse over the first point of the selection. The color of the mouse pointer changes to yellow. Now left-click once more and your selection is finished. 
After you finished drawing the selection you will notice a new item in the workspace-list, namely a Polygon Selection under the Draw Selection entry. If it is not already selected do so. Right of the workspace panel you can see the Selection Controls. Select Modes and change the Feather value to 25 which will soften the edges of the selection. Also be shure the Anti-Alias option is checked.  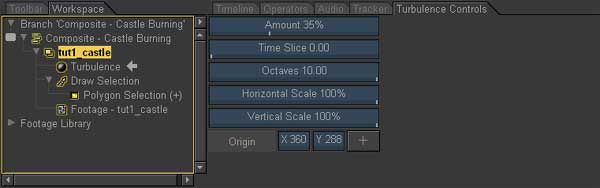 Adjust the options as seen in the picture above: Amount: 35% Octaves: 10.00 If you still don't see any change in the viewport window most probably you still are looking at the output of the Draw Selection operator in your viewport. Change this by double-clicking on the Composite in the workspace panel. If we preview our composite we see that the turbulence effect does not move. We will now change that by animating the Time Slice value in the Turbulence Controls. Click once on the Animate button - it changes to red indicating that all changes made to any option will automatically generate keyframes. After activating Animate go to the first frame of your composite and change the value for Time Slice to '1.10'. Then go to the last frame of the composite and change the value to '1.40'. Click the Animate button again to deactivate auto-keyframing (it is never good to forget that, it can screw up your composite real good.. ;-). Now preview your composite by hitting space or by clicking the play button on the playback controls. The Turbulence operator makes it appear as though there is smoke in the air which billows slowly. The turbulence only affects the parts of your composite wich were chosen by drawing the selection before. If you don't believe that just temporarily deactive the Draw Selection operator by left-clicking on the yellow-highlighted brush symbol left of it (in workspace panel). You will see that the turbulence now affects the whole image. Reactivate the operator and prepare for some hot effects in the next part of this tutorial. Don't forget to go back to frame 1 before applying the next operator.  After removing the old selection we are now ready to draw a new one which will mark what parts of the picture are to be affected by the Particle operator we are going to add. Right-click the tut1_castle layer and select Operators -> Selections -> Draw Selection. Now draw another selection like the one seen on the picture below:  Okay - so now we are finally ready to add some nice particles to our composite. Right-click on the castle-layer, then select Operators -> Particles..... The operator will be added to your layer and its output is automatically sent to the viewport. Note: As we will apply the particle emitter it will look like the selection we just drew will have no effect on the particles. This is normal, everything will look fine as soon as we change the viewport back to the output of the whole composite.   Double click on the composite to view its output in the viewport. Now you can see the selection affecting the particle operator. (A similar effect can be achieved by using particle-deflectors but those are more cpu-hungry).  Another possible improvement for this composite: As we are working on a still-frame it can't hurt to add some grain to the composite as otherwise it will be quite noticable if we cut it together with 'normal' video. Do this by right-clicking your composite in the workspace panel, then selecting Add Operator -> Grain Management -> Add Grain. Play around with the Add Grain Controls until you are satisfied with the result. Have much fun combusting... :-) tutorial written by Michael Mey |